3D Data Processing
This document provides a step-by-step guide on how to add CityGML for 3D geometry to Masterportal. In Masterportal we need a cesium readable format.
To create the cesium readable format out of the CityGML data we use VC Publisher tool from virtualcitysystems GmbH.
You can try also open source converters, but some might be outdate, eg. https://github.com/njam/citygml-to-3dtiles.
So for this documentation we focus on using VC Publisher, you should have SSH access to this conversion tool. This tools runs on a Server we call it here the VC Publisher Server.
To copy file onto and from this server ssh need to be installed and also s3cmd to copy to s3 storages. Make sure that also the s3 config is on that server.
Table of Contents
- Downloading the 3D Geometry Data
- Copying the Data to VC Publisher VM
- Creating a VC Publisher 3D Job
- Moving Files from VC Publisher Server to S3 Storage
- Adding Access to 3D Data to Masterportal Configuration Files
Downloading the 3D Geometry Data
CityGML for 3D geometry of Berlin is available at this URL.
When you want to use a different source for the 3D model, make sure it is of type CityGML (GML Geographc Markup Language). The file format is *.gml or *.xml. More on CityGML here: https://www.ogc.org/standard/citygml/
To download the data for Berlin via FISBroker , follow these steps:
To get to the data click on the i (information) icon of the FISBroker website:
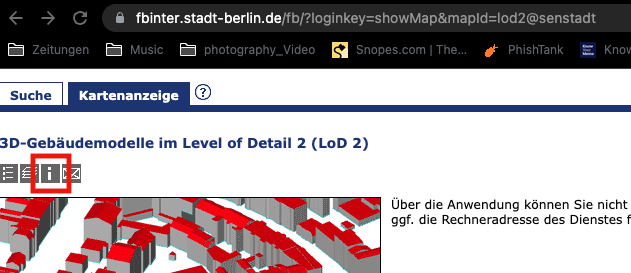
In the right window "Informationen zur Karte" appear.
Look for "Datenbereitstellung: zum Downloaddienst (Atom)"
and click on the link.
A pop up window containing the information "3D-Gebäudemodelle im Level of Detail 2 (LoD 2)" will show up.
For the projekt area of Tegel following zip files need to be downloaded:
https://fbinter.stadt-berlin.de/fb/atom/LOD2/LoD2_381_5825.zip https://fbinter.stadt-berlin.de/fb/atom/LOD2/LoD2_382_5825.zip https://fbinter.stadt-berlin.de/fb/atom/LOD2/LoD2_383_5825.zip https://fbinter.stadt-berlin.de/fb/atom/LOD2/LoD2_384_5825.zip https://fbinter.stadt-berlin.de/fb/atom/LOD2/LoD2_385_5825.zip https://fbinter.stadt-berlin.de/fb/atom/LOD2/LoD2_386_5825.zip
https://fbinter.stadt-berlin.de/fb/atom/LOD2/LoD2_381_5824.zip https://fbinter.stadt-berlin.de/fb/atom/LOD2/LoD2_382_5824.zip https://fbinter.stadt-berlin.de/fb/atom/LOD2/LoD2_383_5824.zip https://fbinter.stadt-berlin.de/fb/atom/LOD2/LoD2_384_5824.zip https://fbinter.stadt-berlin.de/fb/atom/LOD2/LoD2_385_5824.zip https://fbinter.stadt-berlin.de/fb/atom/LOD2/LoD2_386_5824.zip
https://fbinter.stadt-berlin.de/fb/atom/LOD2/LoD2_381_5823.zip https://fbinter.stadt-berlin.de/fb/atom/LOD2/LoD2_382_5823.zip https://fbinter.stadt-berlin.de/fb/atom/LOD2/LoD2_383_5823.zip https://fbinter.stadt-berlin.de/fb/atom/LOD2/LoD2_384_5823.zip https://fbinter.stadt-berlin.de/fb/atom/LOD2/LoD2_385_5823.zip https://fbinter.stadt-berlin.de/fb/atom/LOD2/LoD2_386_5823.zip
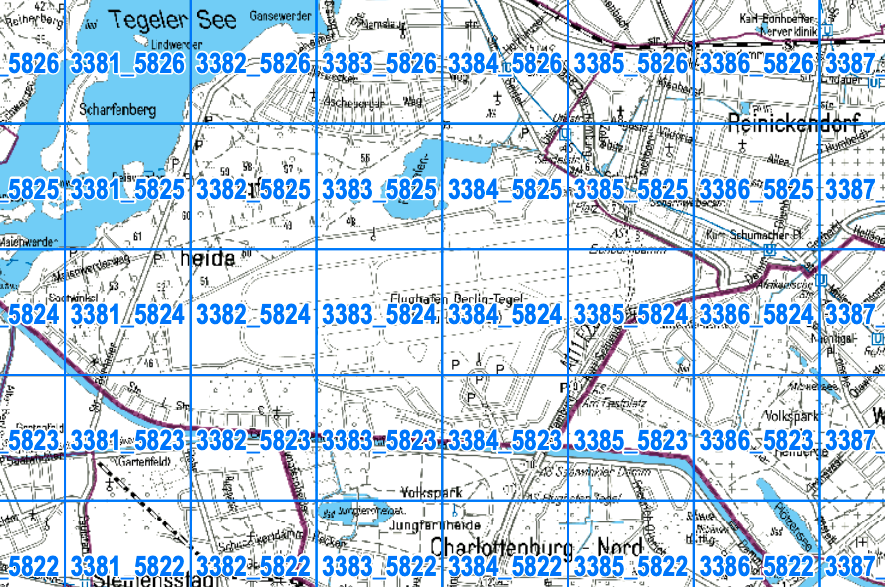
To see a map of Berlin and see the corresponding zip files for a specific area download the "Erläuterung Blattschnittübersicht 1x1 Km" under https://fbinter.stadt-berlin.de/fb/atom/Blattschnitte/1X1_EPSG_25833.pdf
Here is a screenshot of the Tegel area as it appears in that pdf file.
After you downloaded all the files unzip them and move all the files into one folder.
Copying the Data to VC Publisher VM
To copy the downloaded data from your local drive to your VC Publisher tool, use the following command:
scp -vvvv -P *gml YourUserName@YOUR_URL_TO_VCP_Server://vcs/data/txlcitygml/FISBrokerDaten
Off course you can use different folder names for txlcitygml and FISBrokerDaten.
Creating a VC Publisher 3D Job
After you have copied all the files from your local drive to your VC Publisher, you can create a new 3D job.
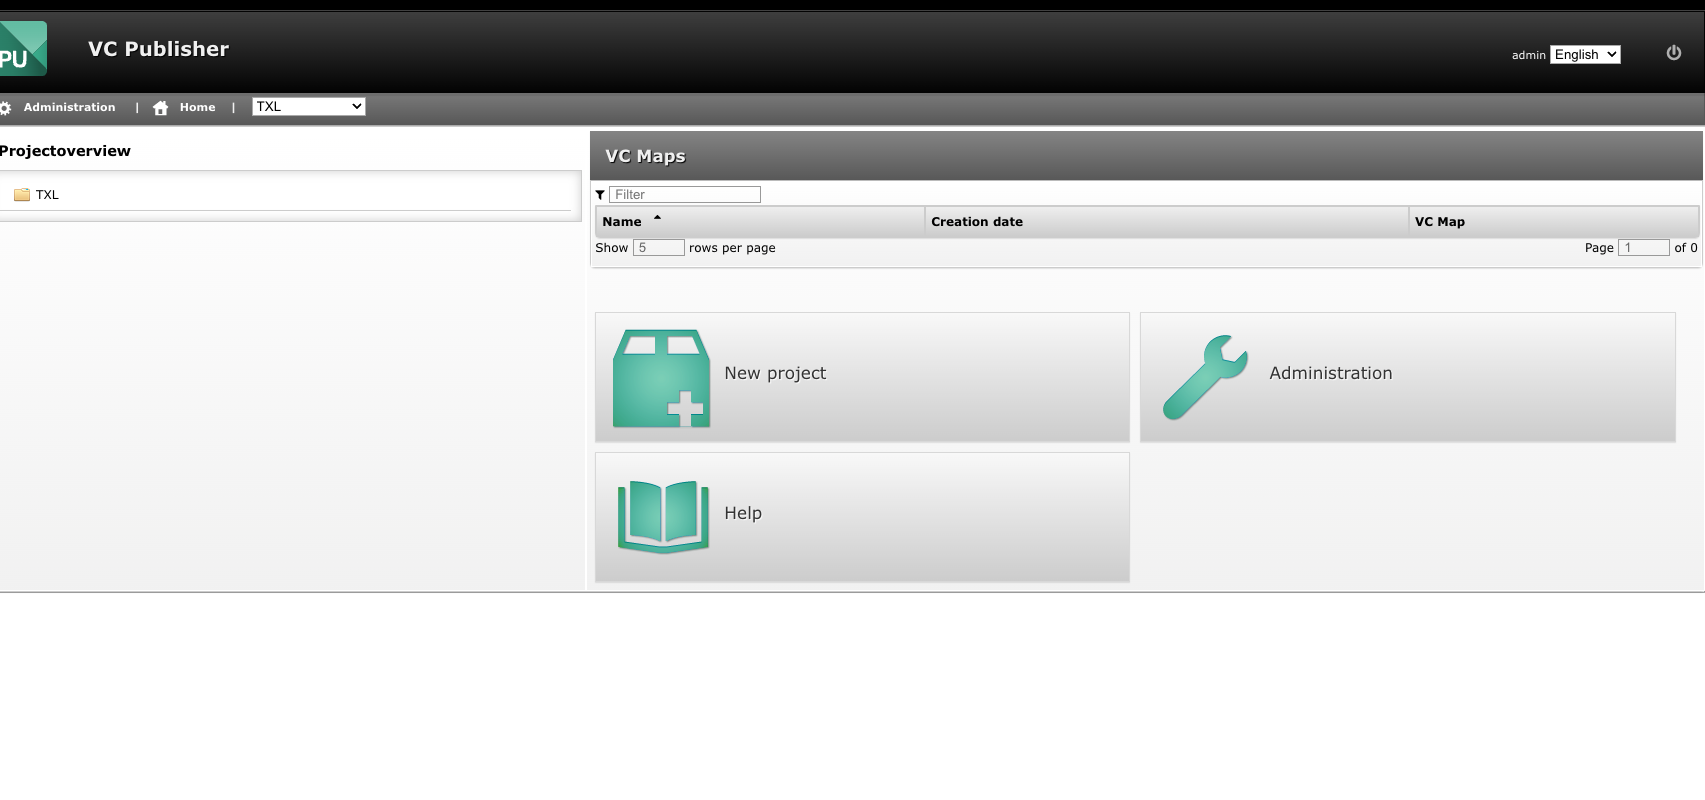
Open a Browser and open the VC Publisher using the URL to the VCP server.
On the homepage click on the project name listed in the top left corner as shown here.
On the next page click on "New 3D-objects Job":

Now you reached the point where you need to provide information about the 3D-objects creation job.
Here is some screenshots what to do in each step.
Step 1 Enter Job Name:
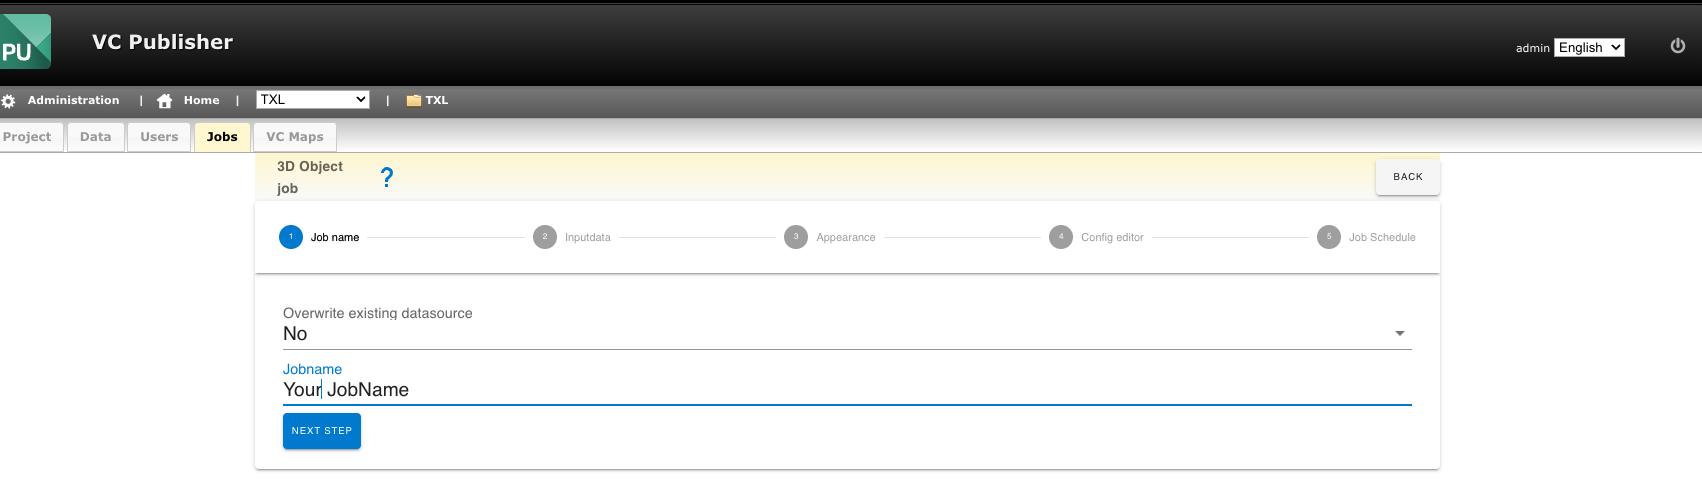
Then and click "Next step"
Step 2 Input Data:
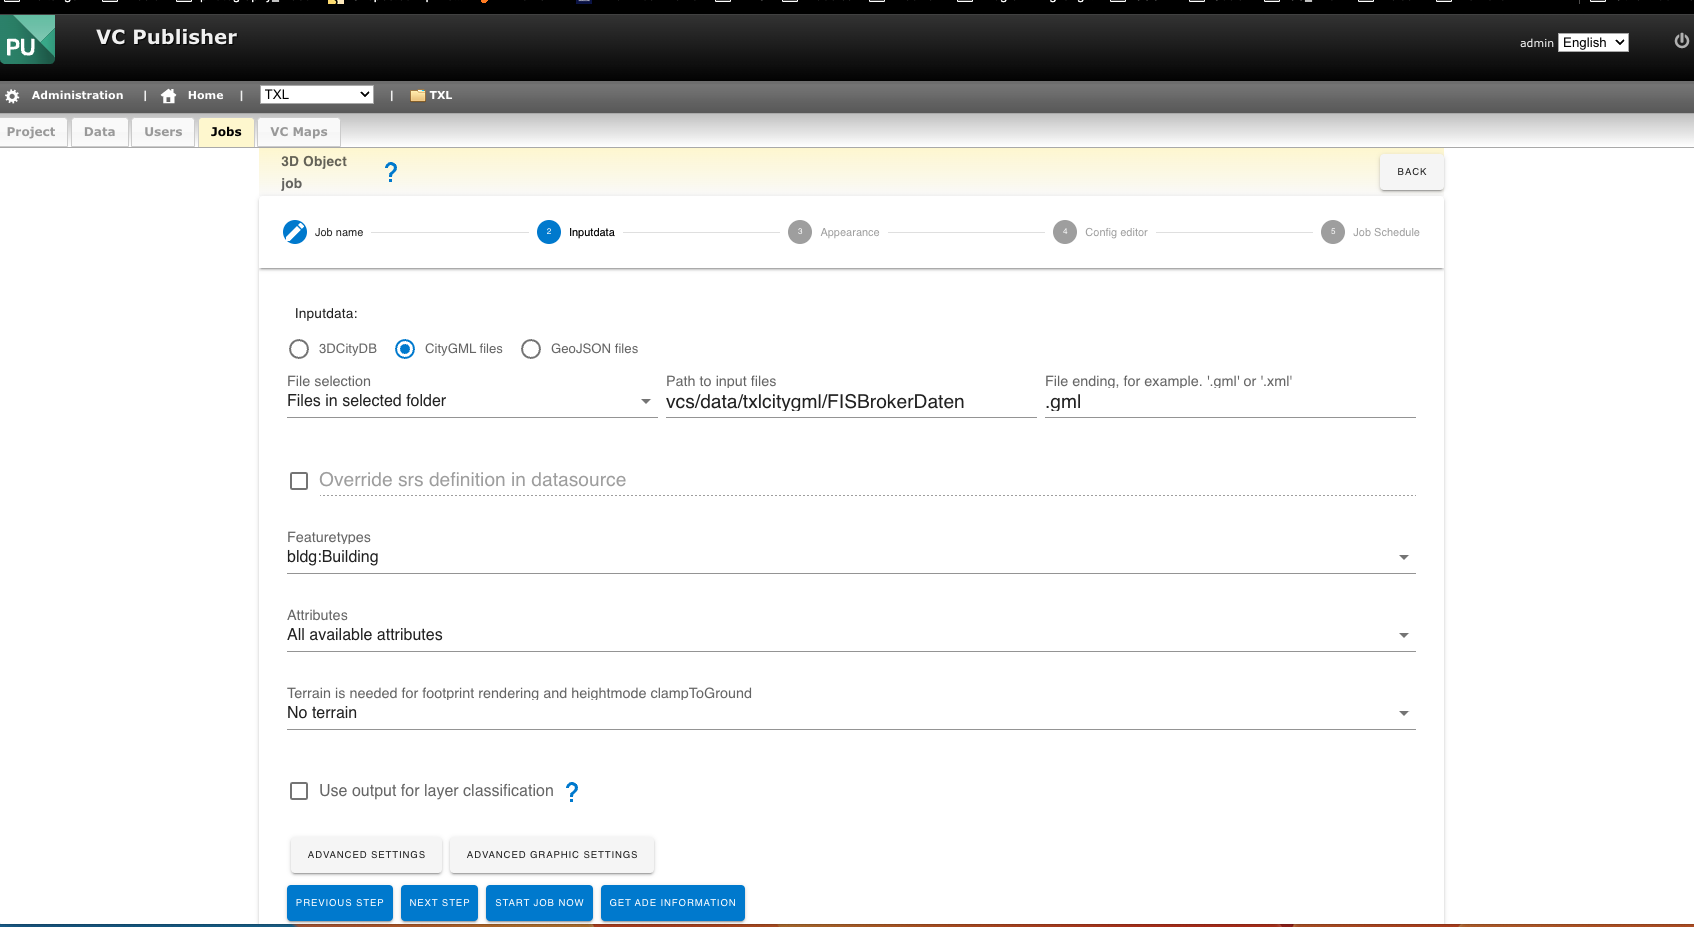
Select CityGML files from the three radio button, in file selection leave the left drop down on "Files in selected folder"
Path to input files is the path where you copied the files from your local drive earlier: in this example "vcs/data/txlcitygml/FISBrokerDaten"
On the right to that you should see a "File ending, for example '.gml' or '.xml'" in our case we type in ".gml"
Leave everything else as it is and click "Next step"
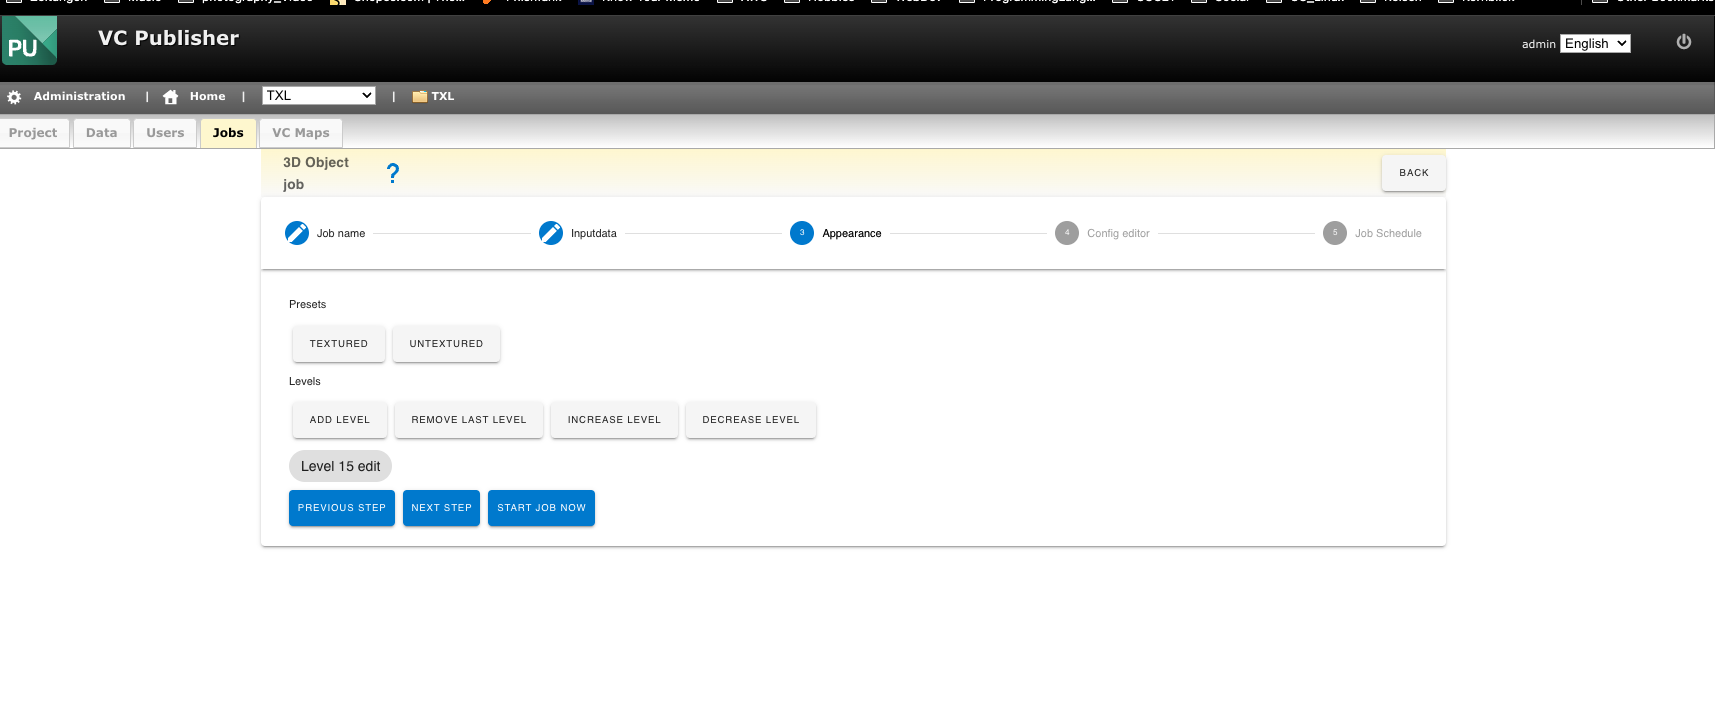
Step 3 Appearance
When you have data with textures please click on "textured" otherwise click "untextured".
Then and click "Next step"
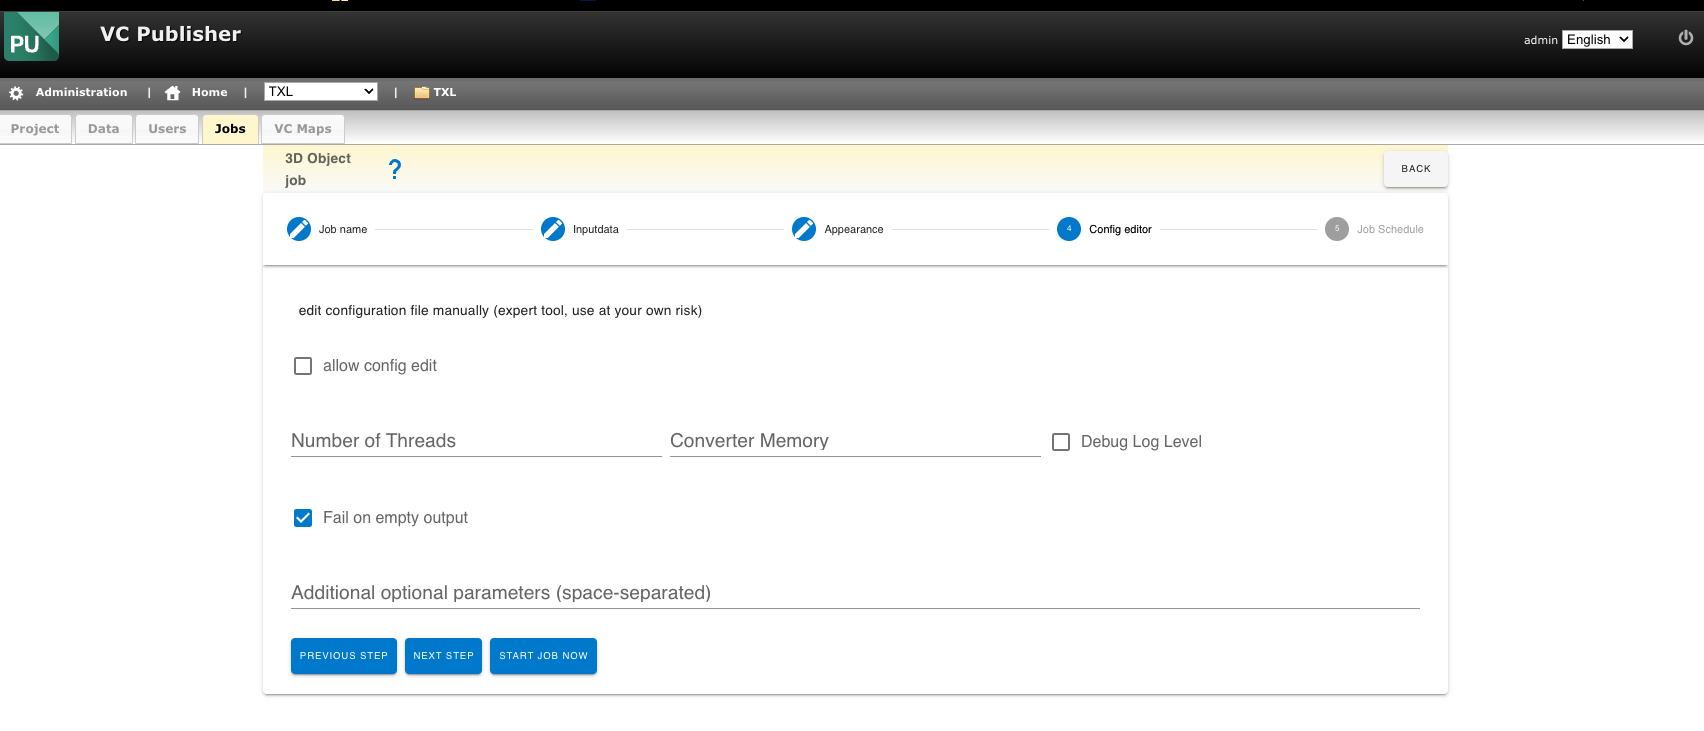
Step 4 config editor
Here leave everything as it is and click "Next step", unless you know what you are doing.
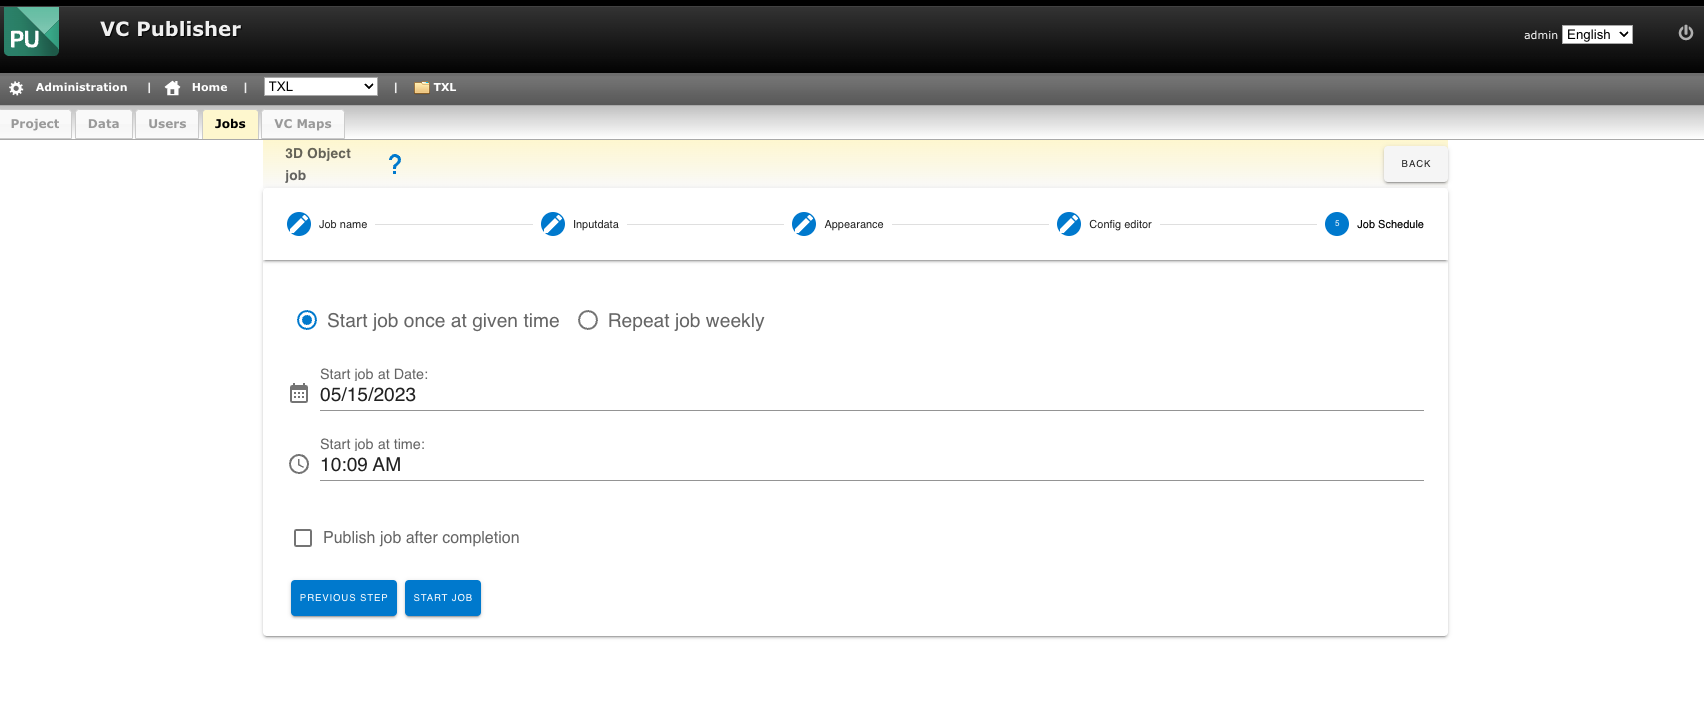
Step 5 Job Schedule
Enter a Job Date as you prefer it should be at least a couple of minutes after the current time.
Once you have completed all the steps wait until the job has finished.
Get outputDir
When the Job has finished you see a list like in the following screenshot, or when you closed the VC Publisher you can come back later. When you come back later click on your project and then hit the "Jobs" tab below of the general menu.
An overview of all Jobs should show up.
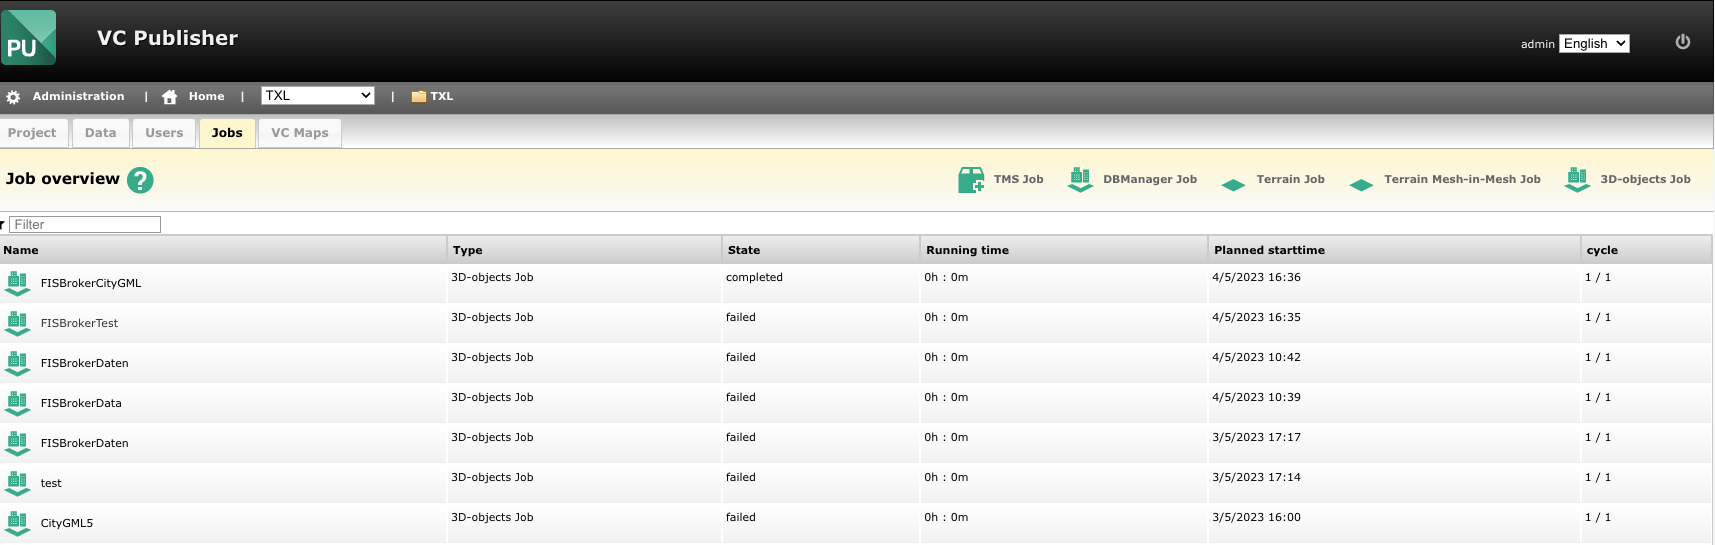
Look at your job you have created and see the status of it, it should say "completed".
Now you can click on the Job Name in our example here "FISBrokerCityGML"
This should show up:
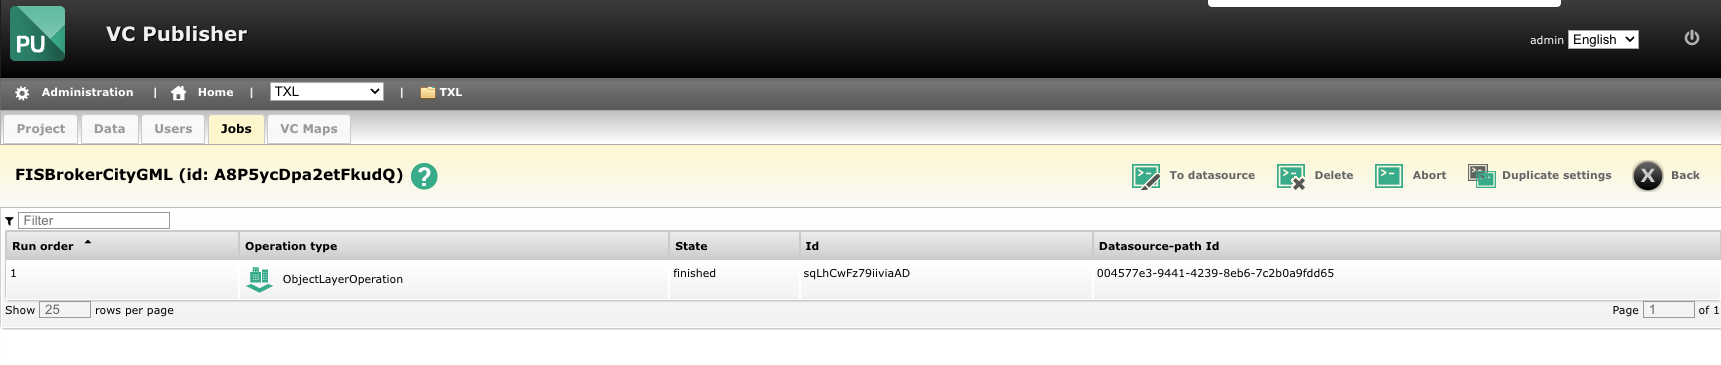
There you click on "ObjectLayerOperation" a list with General settings is showing up.
Open the search in window or "find" field "CTRL + f" on windows or "command + f" on mac.
Type "output" or "outputDir".

Then you should have one find, jump to it:
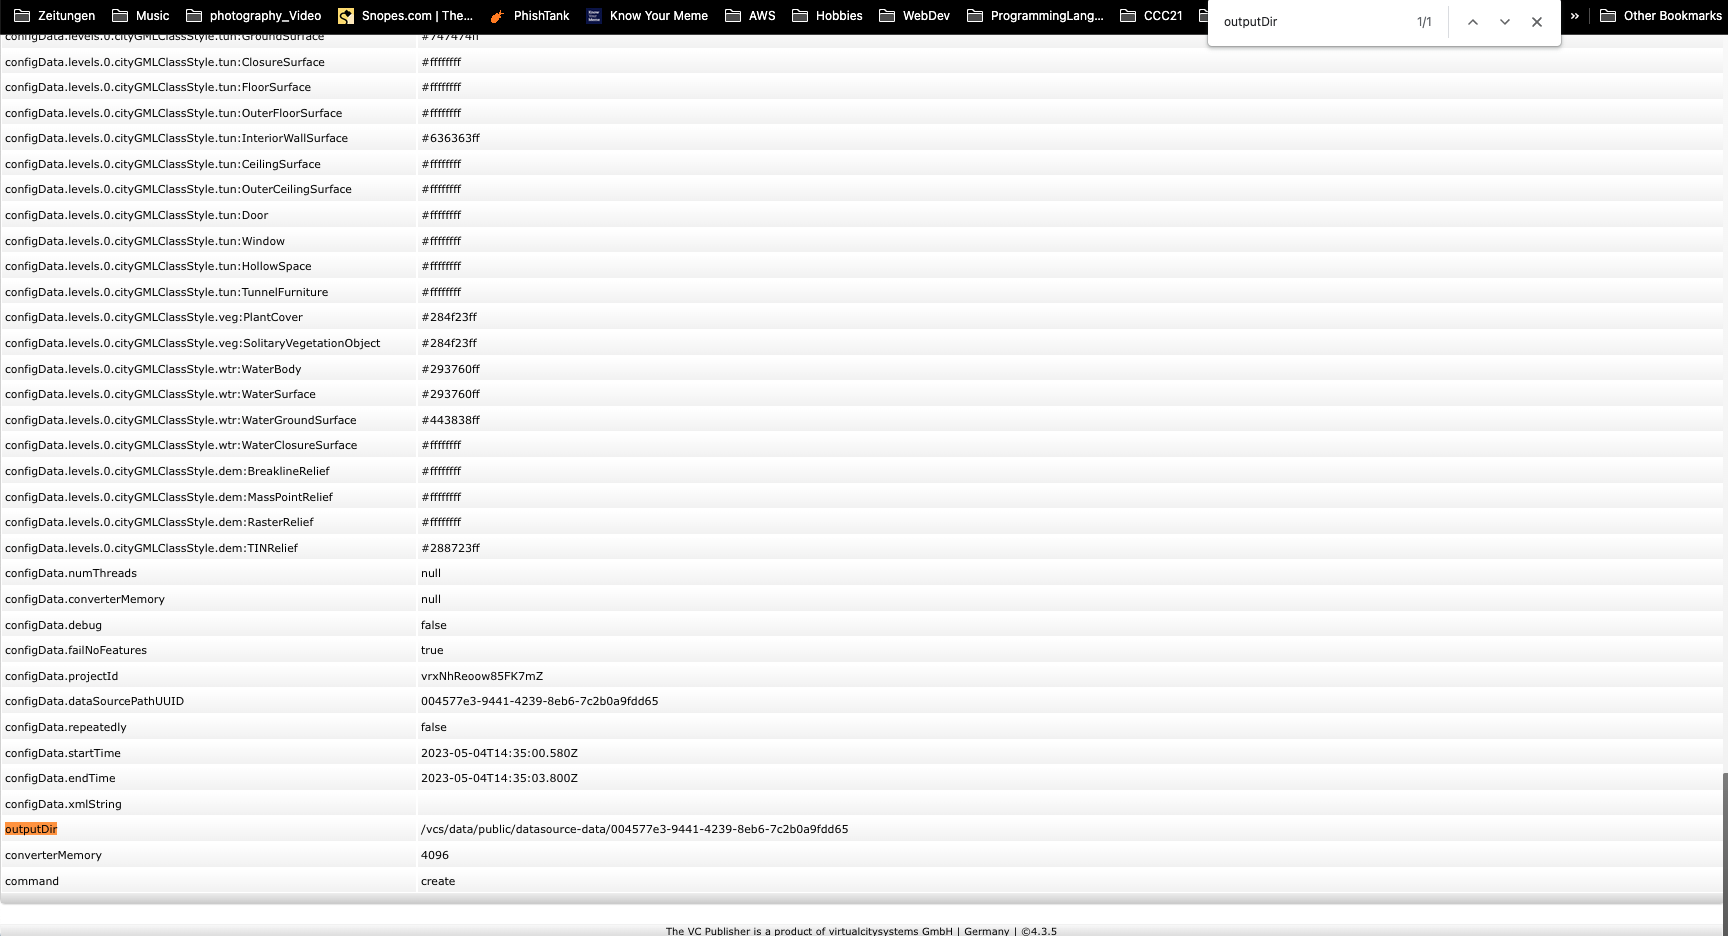
Copy the path which should look like this
/vcs/data/public/datasource-data/004577e3-9441-4239-8eb6-7c2b0a9fdd65
Moving Files from VC Publisher Server to S3 Storage
Using the same SSH login credentials when you copied the CItyGML files onto the VC Publisher Server now again log into the VC Publisher server via SSH. Note that the vcs directory is mounted as vcp on the server. Navigate to this directory:
/vcp/data/public/datasource-data/
Rename the folder created by the 3D job (for example, 004577e3-9441-4239-8eb6-7c2b0a9fdd65) to something more readable, like 3d_daten_fisbroker. Then, upload this folder to the s3 storage:
s3cmd put --recursive 3d_daten_fisbroker s3://YOUR_s3_storage/3D/3d_content/3d_daten_fisbroker
Adding Access to 3D Data to Masterportal Configuration Files
Go to the repository of the masterportal and add the following code to service-internet.json:
   {
      "id": "3d_IDNAME",
      "name": "YOUR LAYER NAME AS IT APPEARS IN MENU IN GEOPORTAL",
      "url": "3D_PROXY_URL/3d_content/3d_daten_fisbroker",
      "typ": "TileSet3D",
      "gfiAttributes": "showAll",
      "layerAttribution": "nicht vorhanden",
      "legendURL": "ignore",
      "cesium3DTilesetOptions": {
         "maximumScreenSpaceError": 0
      },
      "urlIsVisible": true,
      "roles": [
         "ds_nda"
      ]
   },
And add the following to config.json:
		"Fachdaten_3D": {
			"Layer": [
				{
					"id": "3d_IDNAME",
					"name": "YOUR LAYER NAME AS IT APPEARS IN MENU IN GEOPORTAL",
					"visibility": true
				},
After you have made these changes, the CI/CD pipeline should complete and the new Masterportal pod in the k8 cluster should be pulled. You should then be able to see the newly added layer in 3D view mode.